
Managing Spam and Junk E-mail in Microsoft 365
Refer to the information below for information about spam and junk mail filtering in Microsoft 365.
How to Report Spam
Please use the Report Message options shown below to report spam/junk/phishing email.
Messages routed to your Junk Mail folder were successfully processed and do not need to be reported.
As of June 2022, the Report Message should appear on most Outlook clients. If you do not see the button from Outlook on your PC, please navigate to Outlook in the Microsoft 365 portal, open the email, and use the Report Message feature to report the message as Junk or Phishing.
Example from Outlook on Windows: 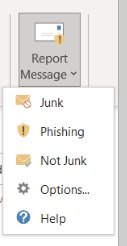
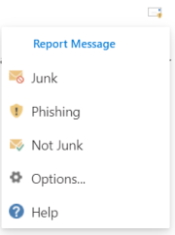
Choose the appropriate reporting level (e.g. "Phishing") and then choose to send a copy of the message to Microsoft from the following screen - you may check the option so that you're not always prompted to confirm before reporting junk or phishing email.
How Office 365 handles SPAM:
"High confidence spam," which is spam that is marked as very high probability as spam, is automatically quarantined and not delivered to user mailboxes. All other e-mail noted as possible spam is delivered to a user's Junk Email folder in Office 365. Users will no longer receive End User Digest e-mails alerting them of e-mail marked as possible spam and should check the Junk Email folder for e-mails they were expecting to receive but did not.
User's can use the options below to add safe senders and manage junk e-mail settings in Office 365. A user's safe sender list takes precedence over e-mail that would otherwise be marked as High Confidence Spam.
- Manage Safe, Trusted and Blocked email settings
Note: Safe Sender lists are limited to 1000 entries and must be specified as full e-mail addresses because adding Safe Sending domains is not supported. Blocked Sender lists are limited to 500 entries, which can be full email addresses and/or email domains. - Blocked and Allowed maximum entries are approximate and have a cumulative maximum. Keeping these lists as short as possible are ideal.
- Update Junk Mail Level of Protection
Blocked Attachments In Office 365
Exchange Online Protection is configured to block attachments with executable content as well as certain file types, including the following:
- b64
- bat
- bhx
- cmd
- cpl
- dll
- exe
- hqx
- mim
- pif
- ps1
- scr
- shs
- uu
- vbe
- vbs
- wsh
- xxe