
Configure Outlook to Connect Directly to a Shared Mailbox in Office 365
The process to setup Outlook to connect directly to a shared mailbox is outlined below. The instructions assume this is your first time opening Outlook, which will result in the setup wizard being launched. If you are not prompted with the account setup wizard when opening Outlook, launch it from within Outlook under "File" > "Account Settings" button > "Account Settings..." option > "New" or use the Mail utility in the Control Panel to create a new Outlook profile.
Instructions
- Start Outlook.
- Click "Next" on the Outlook welcome screen. (New setup only)
- If prompted with a question asking if you want to set up Outlook to connect to an email account, click "Yes" and then click "Next " to continue.
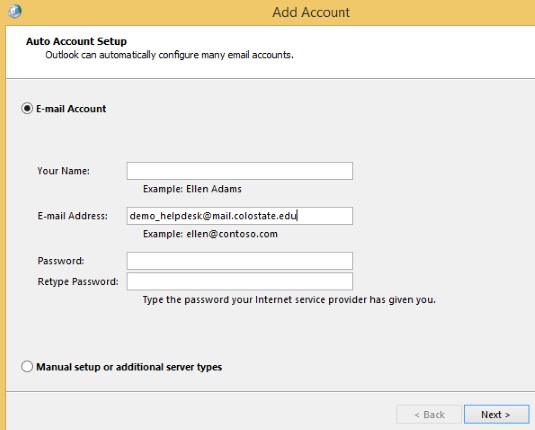
- On the Auto Account Setup screen under E-mail Account, the "Your Name" and "E-mail Address" fields may be filled in automatically based on the log in to your computer. To configure Outlook to connect to an Office 365 shared mailbox, you must remove the pre-filled e-mail address and enter the full e-mail address (ex: acns_demo@mail.colostate.edu) of the shared mailbox in the E-mail Address field. Clear the Your Name field as shown below and leave the password fields blank as well. Click Next to continue.
- Outlook will auto-configure settings based on the e-mail address you provided. When prompted for a User Name and Password, enter either credential below:
- Enter your eID username as eName@colostate.edu (the @colostate.edu portion is required) in the User Name field and your eID password in the Password field. When using this method, you must be a member of the shared mailbox's permissions group.
- Enter the username and password assigned to the shared mailbox. More Info >>
- You will see a message indicating the account was successfully configured. Optionally, you may click the "Change account settings" checkbox to configure advanced settings. Otherwise, click "Finish" to complete the wizard:
- Each time you start Outlook you may be asked to enter credentials. Enter either "eName@colostate.edu" or "SharedMailboxUsername@colostate.edu" in the User Name field (depending on which access method you're using) and the corresponding password in the Password field when prompted.